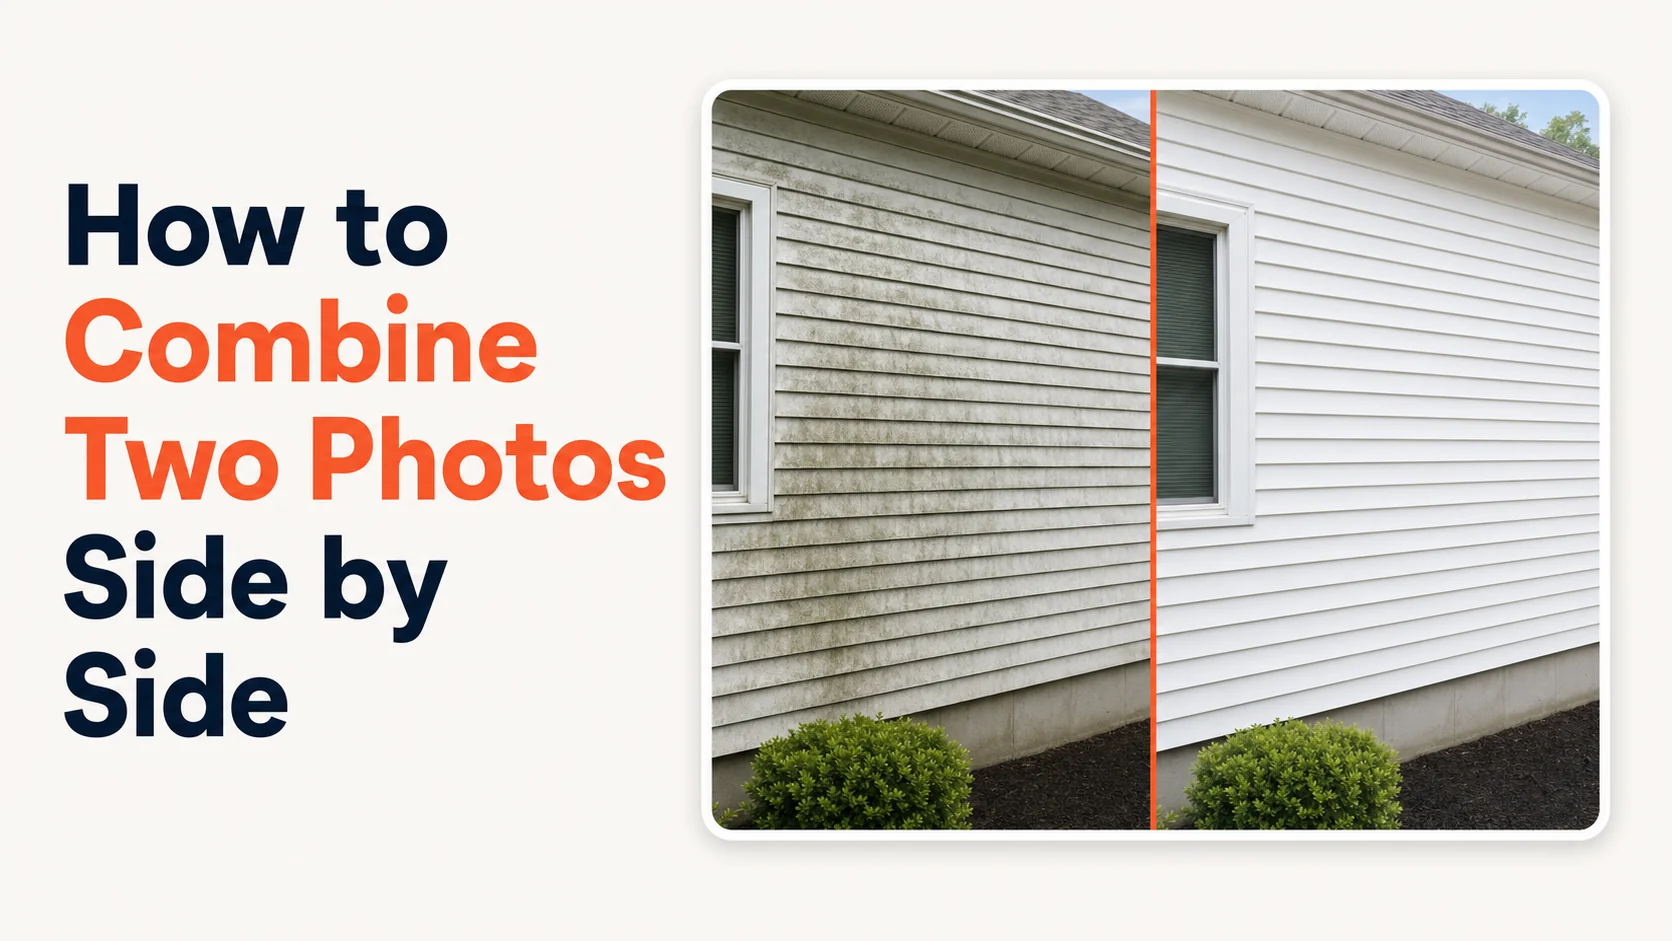
For three years, I spent five to seven minutes in Photoshop every time I needed to combine two photos side by side.
That's not a typo. Five to seven minutes. Forty times a week. I run a cleaning business in Grand Rapids and almost every job has a before and after worth showing. I had Photoshop open already, so I used Photoshop. I never stopped to ask if there was a better way.
There was. I built it. Here's what I learned along the way.
The 30-Second Answer
To combine two photos side by side, you upload both images to a browser-based tool, pick horizontal or vertical, and download the result. The whole job takes about ten seconds. Hosted Snap does this with no signup, no watermark, and no upsell wall between you and the download button. Most other tools fail at least one of those three.
That's the whole job. Everything below is what I wish someone had told me before I burned 150 hours a year on Photoshop.
The Trap I Was In
Top Care Cleaning has been in my family since 1980 — my dad and uncle started it. I came up working alongside my brother, doing carpet extraction, gutter cleaning, pressure washing, the whole spread. Now I handle accounting, marketing, and most of our digital presence.
The marketing piece means a lot of before/after photos. Driveways. Roofs. Carpets. Windows. Christmas light installs. Every visible-result job produces a photo pair somebody wants to see.
For years my "system" was: shoot the before on my phone, finish the job, shoot the after from the same angle, dump both into Photoshop on the laptop at the end of the day, build a two-up layout, export, post.
Five to seven minutes per pair. Forty pairs a week. Fifty weeks a year.
That's 150 to 230 hours of my time every year doing a job a browser tool does in ten seconds. At what an owner-operator's hour is worth, I was burning somewhere between $7,500 and $11,500 a year on the world's slowest photo workflow. Nobody made me do this. I did it to myself because Photoshop was already open.
I'm telling you this because if you're a service-business owner reading a guide on how to combine two photos side by side, you're probably in some version of the same trap. Use what's at hand, never ask if there's a faster way. Get out.
The Technique (Same Five Steps in Every Tool)
The technique is universal. Tool choice is just which interface wraps it.
1. Pick two photos with matching orientation. Two portrait shots merge into a clean horizontal pair. Two landscape shots stack cleanly. One of each looks bad unless you crop one to match.
2. Pick horizontal or vertical. Horizontal (left/right) reads as comparison — before/after, option A/option B. Vertical (top/bottom) is better for Instagram Stories or when your photos are landscape and you want a square or tall output.
3. Pick spacing. Default to a 4-8 pixel white gap between the photos. It reads as "two separate moments." Zero gap reads as "this is one wider scene." A thick colored border or shadow reads as Pinterest 2014.
4. Match the exposures if needed. This is the step nobody mentions. If one photo is bright and one is dark, the eye can't read the comparison cleanly. Most browser tools have a one-tap auto-balance. Use it.
5. Export at the right size for the destination. I'll cover the right sizes for each platform below. Default for general use: 2160px on the long edge, JPEG.
That's the work. Now the tools.
What I'd Wish I'd Known About the Tools
I tried roughly a dozen tools over the years. Rather than naming names — I don't like calling out other people's businesses by brand — here are the patterns I ran into. If you've shopped around in this category, you'll recognize them.
The freight-train-to-deliver-a-pizza category. Big general-purpose design tools that can absolutely combine two photos, but the editor was built for posters, presentations, and marketing collateral. The two-photo job gets done, but you've waded through templates, brand kits, animation panels, and a Pro upgrade nag to get there. Overpowered for the actual work.
The signup-wall category. Free to edit. Not free to download. You upload your photos, build the layout, hit Download, and a modal asks for your email. Then they email you. Then they keep emailing you, even after unsubscribe. Free tier is the trade — your email for the export.
The watermark-on-your-own-work category. Free tier produces a combined photo, but stamps the tool's logo across the corner. You spent twenty years building a business; somebody else's brand goes on your before/after photo unless you pay. That one bothered me the most.
The honest-free category. A small number of tools — including some that look like the interface was last touched in 2011 — that just let you upload, merge, and download with no friction. They exist. They're rare. The UI is usually rough because nobody's monetizing it enough to invest in design.
The big-pro-software category. Photoshop, Affinity Photo, GIMP. Worth it only if you batch hundreds of pairs at a time. For one pair, you'll spend more time launching the app than doing the merge. Ask me how I know.
The iOS Shortcuts category. Apple's Shortcuts app has a Combine Images action. Once you build the shortcut, it's one tap. Free, native to the device, no third-party anything. The catch is you're locked to iOS — useless if you also work from a laptop or a tablet.
That's the landscape. I built Hosted Snap because I wanted one tool that fit none of the patterns above — no upsell wall, no watermark, no signup gate, and an interface that doesn't look like an abandoned shareware page. Free tier is a real free tier. Paid tier exists for branded watermarks and bulk operations when you actually need them.
Side-by-Side on iPhone (Without an App Install)
The Photos app on iOS doesn't have a one-tap "combine these two photos" button. There are three workarounds.
The Markup hack. Take a screenshot of Photo 1. Take a screenshot of Photo 2. Open the first in Markup, paste the second on top, drag it next to the first. Save. Works, but the output is your screen resolution (1170×2532 on a recent iPhone), not the original photo resolution. You lose quality.
Shortcuts. Apple's Shortcuts app has a "Combine Images" action that takes selected photos and merges them horizontally or vertically. Once configured, it's one tap. This is the cleanest built-in iOS path.
The Layout app from Instagram. Free. Works in seconds. Locked to Instagram's preferred sizes — fine if that's where you're posting, annoying if you want a 4:3 or 2:1 aspect ratio for somewhere else.
If you'd rather skip app installs entirely, open a browser, go to Hosted Snap, upload, download. Same job. Doesn't care which device you're on.
Side-by-Side on Android
Android is messier because the answer depends on which manufacturer made your phone.
Most stock photo apps ship a collage feature, but the templates are locked — you don't pick which photo goes where, the algorithm does. Workable for general use, frustrating for specific layouts.
Some manufacturer-skinned photo apps are better, with more control and up to six images per layout.
Some stock Android builds ship no collage tool at all.
Honest answer for Android: same as the universal answer. Open a browser, go to a web tool, do the job in ten seconds, close the tab. The app-install path on Android adds friction without adding meaningful capability.
Layout Choices That Make a Combined Photo Look Professional
The mechanical job (merging two images) is easy. The creative job (making it look like a real comparison, not a 2014 Pinterest collage) is what separates a post that gets engagement from a post that gets scrolled past.
Before goes on the left. Always. The eye reads left-to-right. Reversing it makes the after look like the before. Don't get cute with this for variety.
Crop both to the same framing. If your before is a wide pull-back shot and your after is a close-up, you're showing two different scenes, not one comparison. Crop the wide shot to match the close-up's framing before merging.
One thin white gap. That's it. No colored borders. No drop shadows. No "BEFORE" / "AFTER" stamped in bold sans-serif. The split itself communicates the contrast. Adding visual clutter weakens it.
Match the time of day. Shoot the after at the same time as the before when you can — same shadow direction, same color temperature. A 10 a.m. before and a 6 p.m. after are doing two different jobs.
Skip the giant labels. No "BEFORE" in 80pt Impact font over the left half. The reader can see the difference. The label says "I don't trust you to notice."
Sizes That Work for Each Platform
Right-sizing up front saves you an export-and-re-export.
| Platform | Side-by-side dimensions | Aspect ratio |
|---|---|---|
| Instagram feed (square) | 2160 × 2160 | 1:1 |
| Instagram feed (4:5) | 2160 × 2700 | 4:5 |
| Instagram Stories | 2160 × 3840 (vertical split) | 9:16 |
| Facebook timeline | 2048 × 1024 (horizontal) | 2:1 |
| Google Business Profile | 1200 × 900 minimum | 4:3 |
| Twitter / X | 1600 × 900 | 16:9 |
| 1200 × 627 | 1.91:1 | |
| Print (letter) | 2550 × 3300 @ 300 DPI | letter |
How a Cleaning Business Actually Uses This
I'm going to walk you through the actual workflow we use at Top Care because this is the part that's been worth the most to me, and it might save somebody else the three years I spent reinventing it.
The pressure-washing workflow. Tech pulls up to a job. Takes a wide phone shot of the dirty driveway, no edits, no filter. Finishes the job — typically 90 minutes for a standard residential driveway. Takes the same shot from the same spot. Opens Hosted Snap on their phone browser, uploads both, picks horizontal, downloads in about ten seconds. The combined image goes straight to our Google Business Profile post for the day. Total non-cleaning time added to the job: under two minutes.
The carpet extraction workflow. Same flow, but vertical split — carpets shoot better as landscape, which means stacking them vertically gives me a square output for Instagram feed without dead space.
The volume. We post 30-40 of these a month across Top Care's social accounts. The before/afters are the highest-engagement content we run, every single time, by a margin that's not even close. Stock photos and tip graphics don't compete.
If you run roofing, gutter cleaning, pressure washing, soft wash, window cleaning, carpet, upholstery, tile, landscaping, contracting, or any trade where the result is visible — this is your highest-leverage social content. You don't need a marketing budget. You need a phone and ten seconds per pair.
The next problem is what to DO with all these photos once you have them — scheduling, posting, captioning, tracking. That's a separate job, and it's why I built Hosted Proof as the companion app. Snap makes the post. Proof posts it on a schedule that doesn't burn your evenings.
The Free vs. Paid Question (Honest Take)
Free side-by-side tools are good enough for the side-by-side job. Where paid tools earn money is the surrounding workflow:
- Branded watermark on every export — your logo, your colors, embedded in the corner of every combined image so when someone screenshots it on social media your business name travels with the photo. Hosted Snap paid does this.
- Brand kit (saved colors, saved fonts, saved logo) — set it once, every export inherits it. The single highest-leverage paid feature if you're producing volume.
- Bulk operations — combine 20 pairs in one upload. Paid in most tools.
- Direct-to-platform posting — that's Hosted Proof, not Snap. Different tool, different job.
For most people the free tier of any decent tool is fine. If you're a business owner running visible-result work and posting daily, the branded watermark alone is usually worth $10-20 a month.
FAQ
Can I combine more than two photos?
Yes. Most tools support 2-6 photos in a single layout. Past 6, you're into collage territory — Facebook photo collages and Instagram-sized collage layouts are different jobs with different ideal tools.
Will the photos lose quality?
Only if the tool re-compresses them. Hosted Snap exports at the lower of (a) your highest-resolution input or (b) your chosen output size, with no extra JPEG compression. Some free tools downsample aggressively to push you toward paid tiers. Check the output dimensions against what you uploaded.
Can I add text or labels?
Yes, but read the design notes above first. Hosted Snap's paid tier supports text overlays. The free tier is image-only, no text — which is usually the right call.
Does this work on a tablet?
Yes. Any browser tool runs on iPad, Android tablet, Surface, Chromebook. The drag-and-drop feels nicer on a tablet than on a phone.
What file format should I save?
JPEG for social (smaller, fine quality). PNG only if you need transparency. WebP if your destination supports it — Google Business Profile does, Facebook is still iffy. Default to JPEG.
Can I combine a portrait and a landscape photo?
Yes, but they'll look uneven unless you crop one to match the other. Better to crop one first than to merge and then crop the combined output.
Can I do this offline?
No. Browser tools need an internet connection. If you regularly work offline, an iOS Shortcut or a desktop app is the right path. For everyone else, the trade is fine.
Try Hosted Snap (Free, No Account)
Hosted Snap is free to use. No account, no credit card, no email capture before you can download your photo. Upload two images, pick horizontal or vertical, download. Branded watermark and bulk operations live on the paid tier when you want them.
If you run a local service business — and the entire reason Hosted Snap exists is because I do — pair it with Hosted Proof for the next step: scheduling and posting combined images on a sustainable cadence across Instagram, Facebook, and your Google Business Profile. Snap makes the post. Proof posts it. Both are part of Hosted Brands, the suite I'm building because nothing on the market was both affordable and respectful of the owner's time.
About the author
Alex Host is the founder of Hosted Brands and the operator of Top Care Cleaning, a residential and commercial cleaning company his father and uncle founded in Grand Rapids, Michigan in 1980. He builds software tools for local service businesses because every off-the-shelf option was either built for companies ten times his size or priced like one. Hosted Snap is the tool he wishes existed three years ago when he was burning $7,500 a year on Photoshop to do a ten-second job. He's building the whole Hosted Stack in public.