How to Make a Before and After Photo: The Service-Business Owner's Honest 60-Second Workflow
I spent years fumbling through the wrong answer to how to make a before and after photo. I run marketing for Top Care Cleaning — my family's house-washing, gutter-cleaning, roof-cleaning, and window-cleaning company in Grand Rapids, Michigan, started by my dad and uncle in 1980. We run 8-12 jobs a week. Every job produces a transformation. Every transformation should become a post. The tools kept getting in the way. Three minutes per photo is the goal. Twelve minutes was reality until I fixed it.
How do you make a before and after photo?
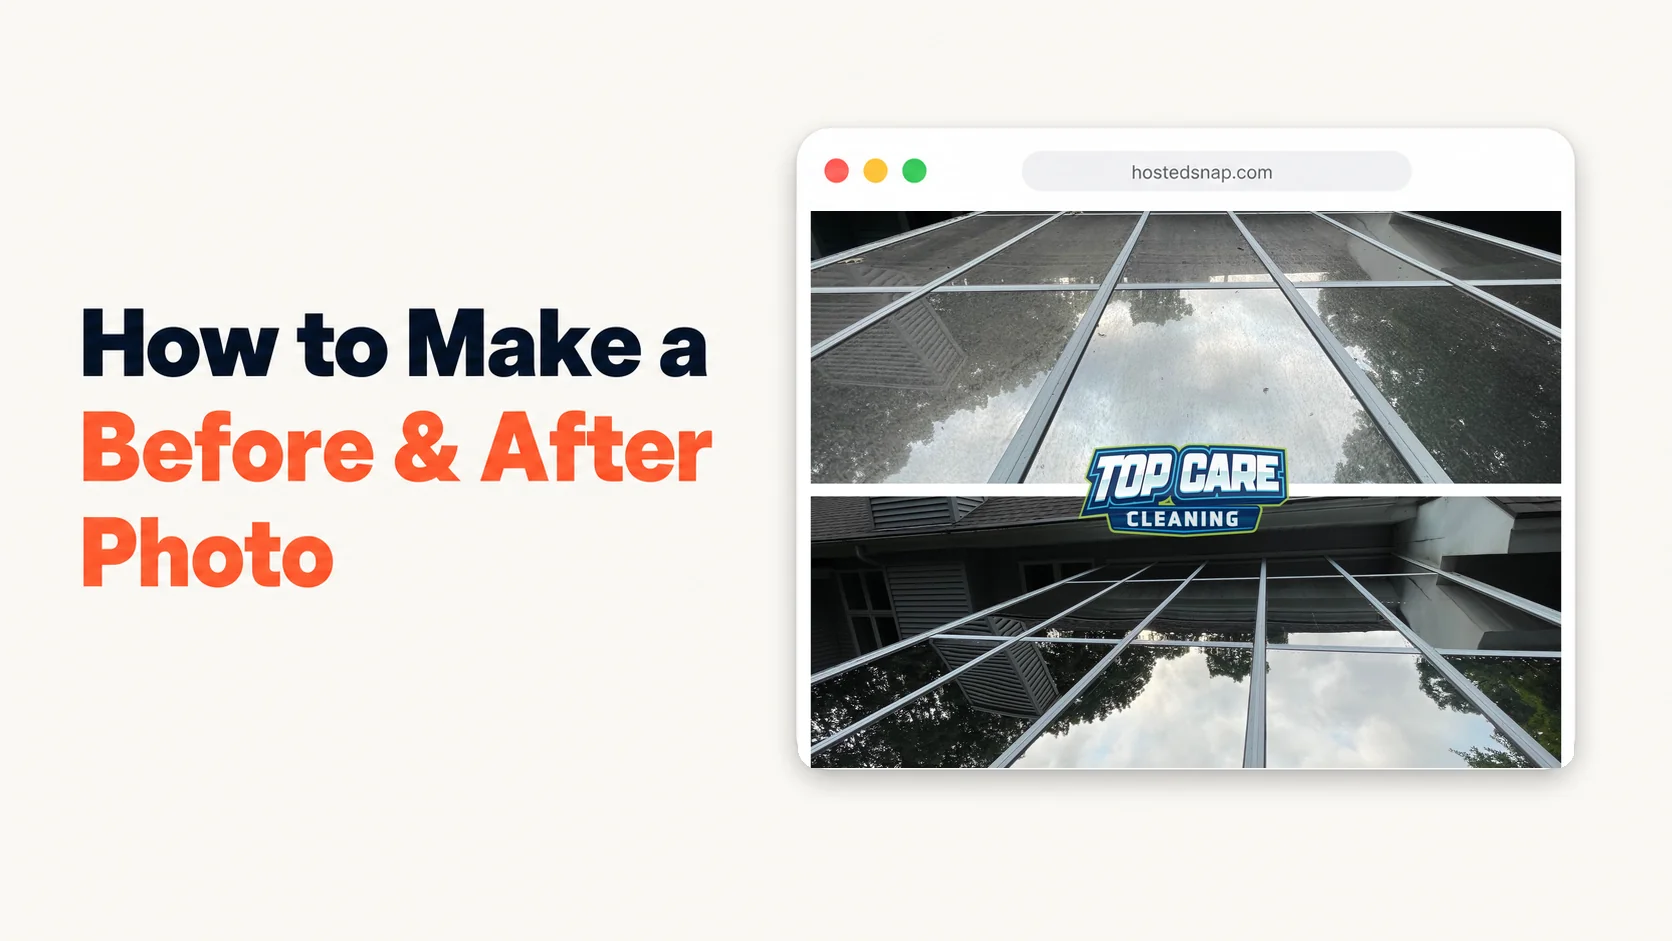
To make a before and after photo, take one photo before the work and one after from the same angle, drop both into a before and after photo maker, select your layout, and download the composite. A good tool finishes in under 30 seconds with no watermark and no signup wall.
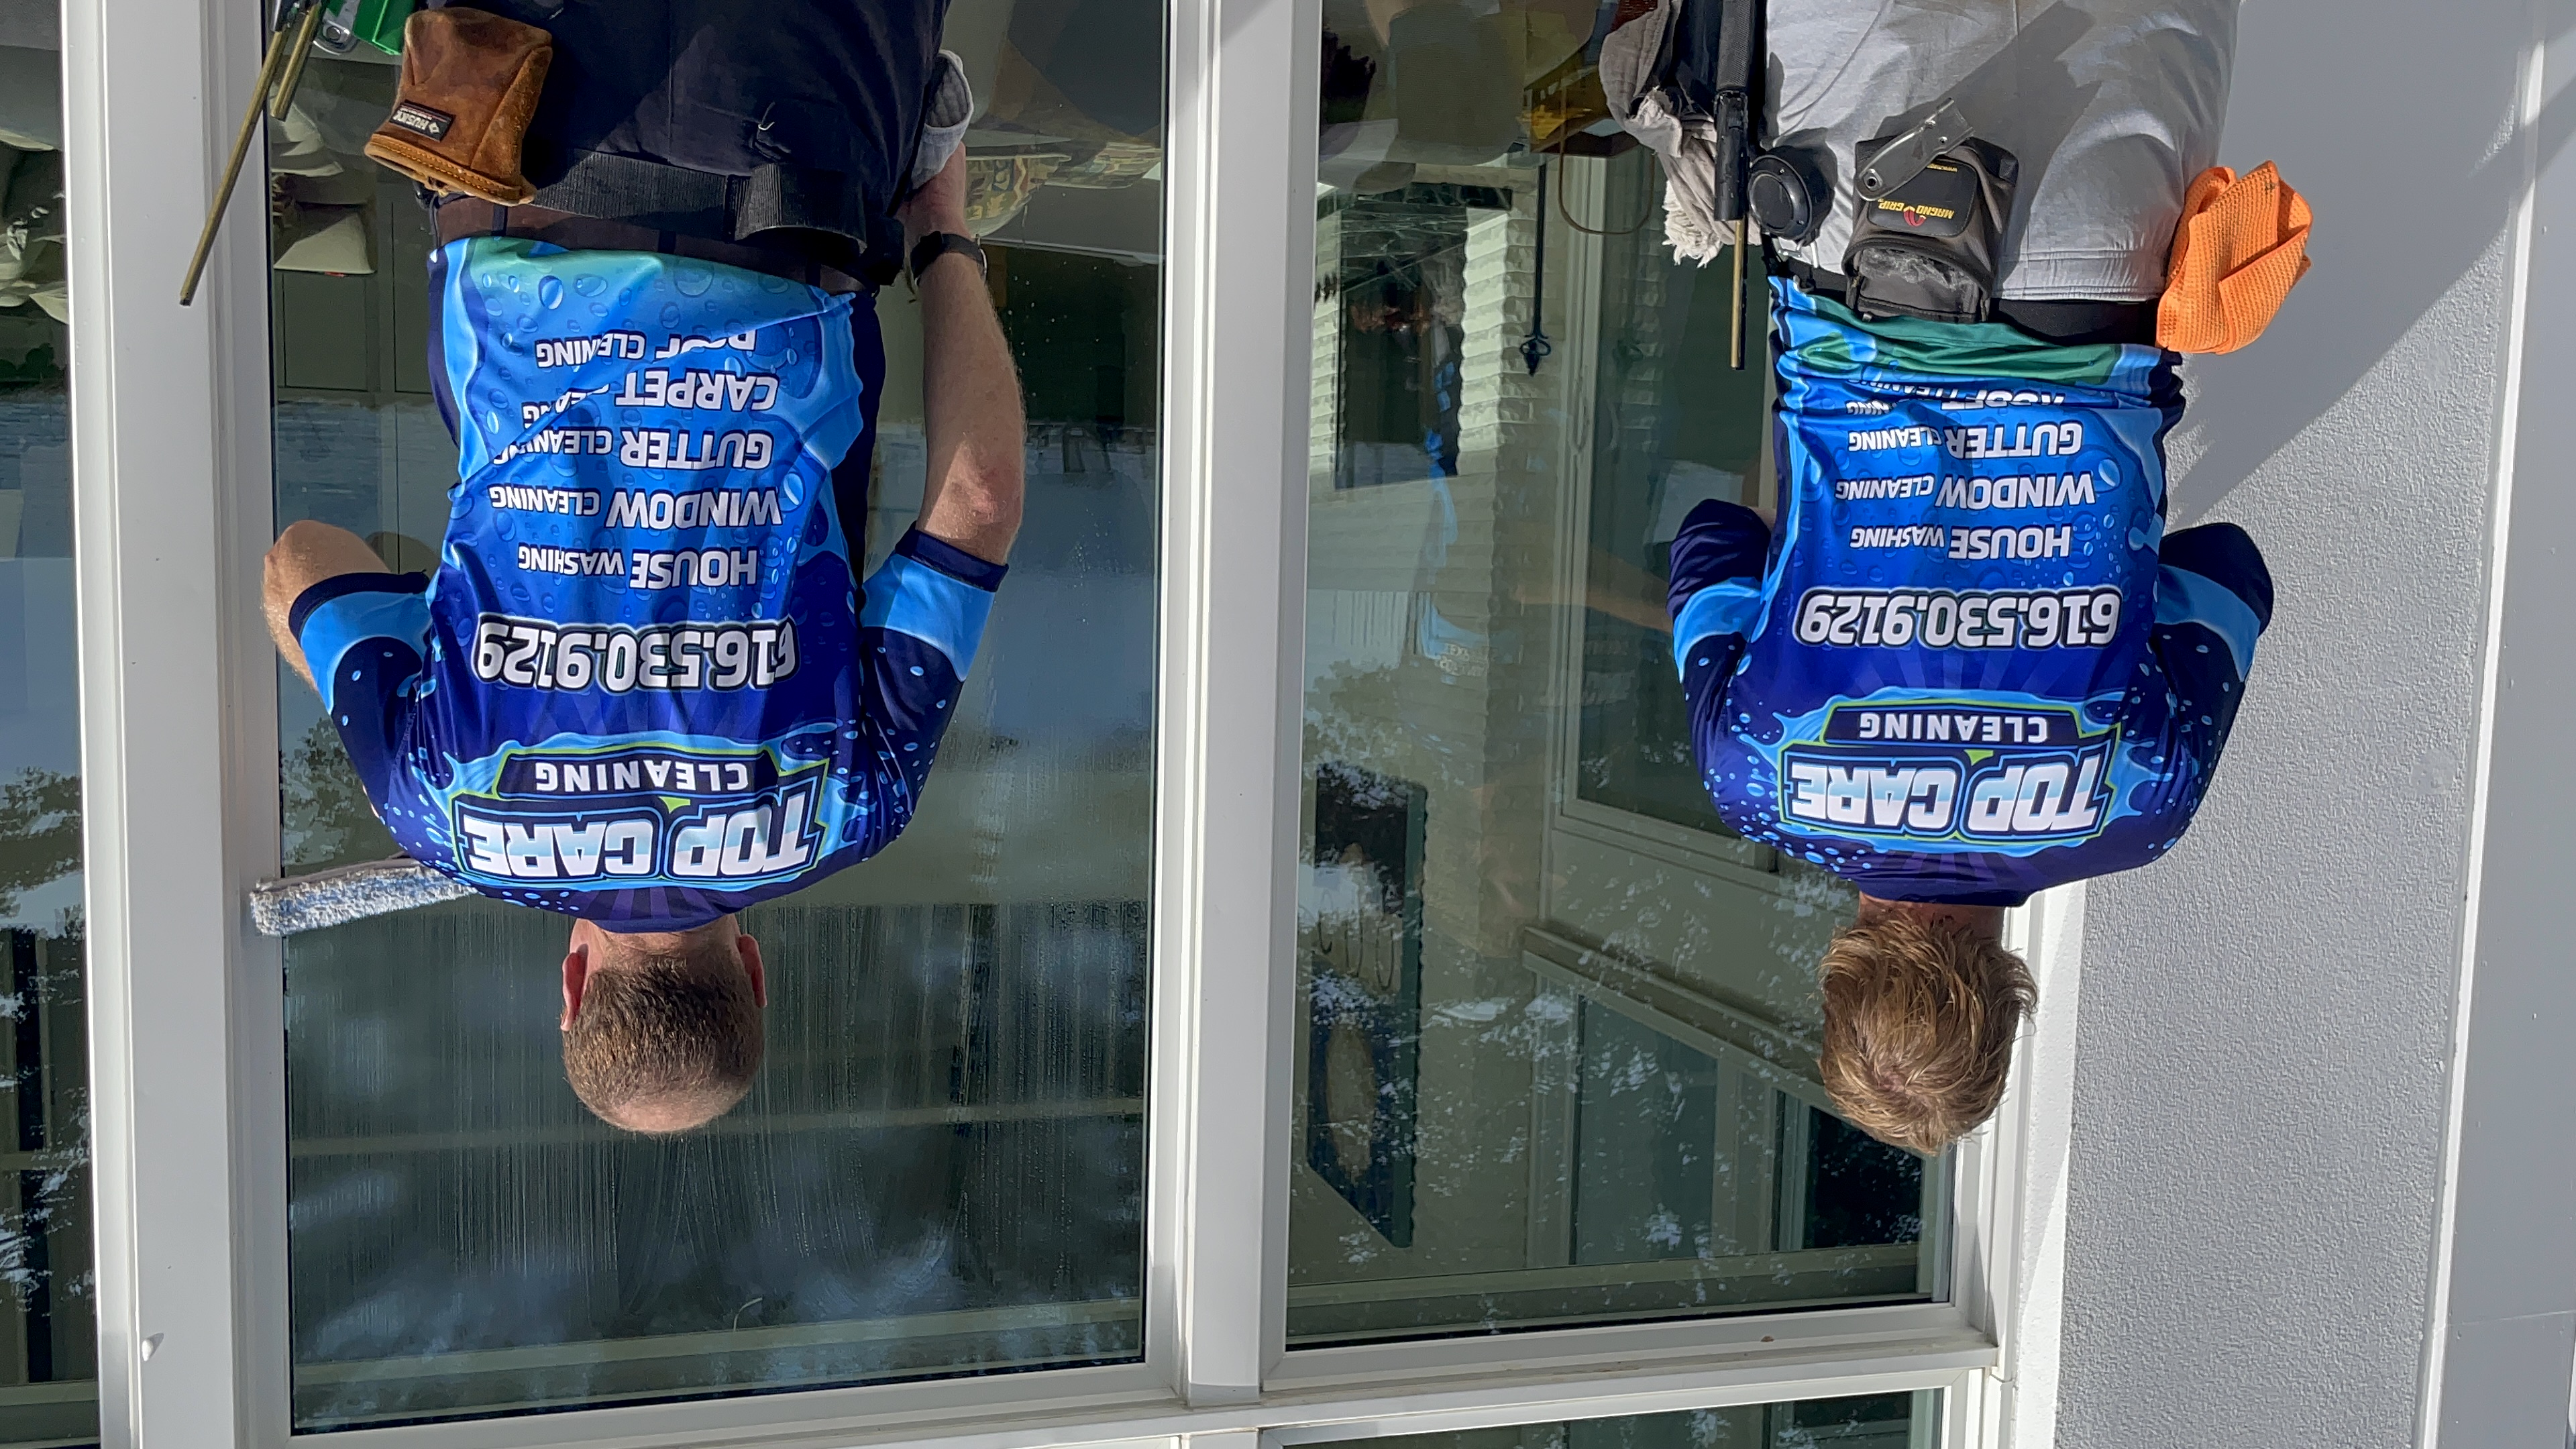 Top Care Cleaning window technicians on a job in Grand Rapids, MI — the kind of in-progress shot that becomes the raw material for any honest before-and-after photo workflow.
Why a Service Business Actually Needs This Workflow
One honest before-and-after photo is worth more for local lead generation than three paragraphs of marketing copy. That's not an opinion — it's what four years of Google Business Profile data tells me at Top Care Cleaning.
Customers searching "window cleaning Grand Rapids" or "house washing near me" are choosing between five companies with similar ratings. A transformation photo cuts through that noise in one frame. The before shows the problem. The after proves you solved it.
The compound effect is what matters. One photo per job, 10 jobs a week, 50 weeks a year: that's 500 proof posts on the platforms that drive real phone calls. No ad budget gets you 500 authentic proof posts. Consistent output does.
Google Business Profile Is Where It Pays Off Most
Google Business Profile rewards three things: review velocity, post frequency, and photo recency. A weekly before-and-after hits two of those three signals every single week without writing a word of new copy.
The photo does 90% of the work. The caption is one sentence. The post takes three minutes. That's the whole system.
Facebook and Nextdoor Close the Loop
Our GBP post goes live Tuesday morning. Same photo goes to Facebook and our local Nextdoor neighborhood groups the same day. The reach on Nextdoor for a before-and-after of a house two streets over is consistently higher than anything we've ever boosted on paid social.
Neighbors recognize addresses. They recognize siding styles. They trust the before-and-after because they can mentally verify it against the house they drive past. That specificity is the trust signal that influencer-tool-priced content platforms will never produce for you.
Customer Emails and Neighborhood Mailers
A before-and-after photo embedded in a post-job follow-up email has a different job than a social post. It's a quiet reminder to the customer of what you did and what they paid for. It plants the referral seed without asking for a referral.
On neighborhood door-hangers and postcards, the same composite image does heavy lifting without a headline. Show the dirty driveway. Show the clean driveway. Add a phone number. That's the whole mailer.
The 60-Second Before-and-After Workflow (Step by Step)
This is the exact process Top Care runs on every job. We trained all our techs to it in one 10-minute huddle. It takes about 60 seconds once it's a habit.
Step 1: Take the Before Photo on Arrival
Pull the phone out when you step out of the truck. Wide angle, same distance you'd stand to show a visitor the house. No crouching, no climbing — just a natural standing shot of the surface or area you're about to clean.
Text it to yourself or drop it in your shared job folder so it doesn't get buried under 40 photos by the end of the day. The biggest workflow killer is a tech who has the before but can't find it three hours later.
Don't apply any filters, don't zoom in. The before photo needs to look like the actual before — not the most unflattering angle you could find to make the after look more dramatic. Authenticity beats artistry on local platforms every time.
Step 2: Take the After Photo From the Same Spot
When the work is done, go back to the same spot. Same height, same orientation, same distance. Your brain should be able to mentally overlay the two photos and confirm they're the same angle.
Same time of day matters when you can manage it. A before photo shot at 8am with angled morning light and an after photo shot at 2pm with overhead sun will look different in ways that have nothing to do with the cleaning. Overcast days are the great equalizer — consistent light, no shadows, no excuses.
Take the after photo before you load the equipment. Once the truck is packed, the tech is in a mental "drive to the next job" mode. The photo gets forgotten.
Step 3: Drop Both Photos Into a Before-and-After Tool
Open a browser-based tool that does exactly one job: take two photos and produce one composite. Not a design suite. Not a brand-kit manager. A tool where the upload slots are the first thing you see, not buried under 47 features and three onboarding pop-ups.
The before and after picture maker article walks through what differentiates the honest tools from the freight-train-to-deliver-a-pizza ones. The short version: if the tool makes you confirm an email before you can see the output, move on.
Pick vertical-split layout for tall subjects (house facades, windows, fences). Pick horizontal-stack for wide subjects (driveways, roof lines, long concrete slabs). Don't overthink the layout — the most important thing is that both photos show the same area from the same angle.
Step 4: Export Without a Watermark
Click download. The file that comes out should be at the resolution of your source photos — not a downsampled 720p version with a banner across the bottom reading "Made with [Tool Name]."
A watermark-on-your-own-work is the silent credibility tax. Every time a customer sees that banner across a photo of their own house, it reads as "I couldn't afford a real tool." That's not what you want the photo to communicate. The work is the brand. The tool should be invisible.
If the tool outputs at a lower resolution unless you pay for "HD export," it's a deceptive-UI tool. Leave. There are honest-free alternatives that export full resolution without an upsell.
Step 5: Post It Before You Leave the Driveway
Google Business Profile, Facebook, Nextdoor — pick the platforms that matter most for your service area and post before you pull out of the customer's driveway. The caption is one sentence: service type, neighborhood, optional trust signal.
At Top Care, ours looks like: "Window cleaning in East Grand Rapids today — inside and outside, streak-free. Booked at topcarecleaning.com." That's it. The photo does the persuasion. The caption handles the context.
Total time from "the work is done" to "post is live": under three minutes. That's the target. Any tool that adds time to that workflow is the wrong tool.
Mistakes That Will Kill Your Before-and-After Photos
I've made every one of these. Listing them so you don't have to.
Different Angles Between Before and After
If the before is shot from 12 feet away and the after is shot from 6 feet away, the composite will look like a sloppy collage. The viewer's brain won't register it as evidence — they'll sense the mismatch without being able to articulate why.
The fix is dead simple: stand in one spot for the before, return to that exact spot for the after. Drop a pin on your phone map if you want a physical reference. Same spot, same height, same orientation.
Mismatched Orientation
A vertical before photo stitched to a horizontal after photo is one of the most common errors I see from service-business owners learning how to make before and after photos. The composite looks broken because one photo is clearly cropped differently.
Fix it in your phone's photo app before you open the combiner tool. Rotate the offending photo to match the other one. Most side-by-side tools handle this poorly — do it upstream.
Applying a Filter to One Photo and Not the Other
Warming up the "after" in your phone's photo editor makes the clean surface look crisper and more inviting. It also makes the before look worse by contrast, in a way that savvy viewers flag as manipulation. Don't do it.
Same filter on both or no filter on either. The transformation should speak for itself. If it doesn't look dramatic enough without a filter, the before photo wasn't taken from a good angle — not a reason to doctor the after.
Waiting Until the End of the Week to Process Photos
Batch processing seven jobs' worth of before-and-afters on Sunday night is a recipe for abandoned workflow. The photos feel stale. The motivation to post them is lower. The details you'd put in the caption are fuzzy.
Make the composite per-job, at the job. Two minutes of phone time while the equipment is loading. Post it fresh, while the job is still vivid. That's when the caption writes itself.
How to Do a Before and After Photo for Different Service Types
The workflow is the same across service categories. The photo technique changes slightly.
Window cleaning: Take the before from inside the house looking out if you can — nothing shows a dirty window like backlit grime. Take the after from the same inside angle. If you can't access the interior, outside-only works. Just match the angles.
Pressure washing (concrete, driveways, sidewalks): Wide horizontal shot that captures the full surface. The contrast on concrete is dramatic — dirty concrete is visibly gray-brown, clean concrete is almost white. No filter needed.
Gutter cleaning: Vertical close-up of the gutter mouth for the before (full of debris), same angle after it's hand-cleaned and flushed. Pair the how to make before and after photo iPhone guide for the mobile-specific workflow if your techs are all on iPhone.
Roof cleaning (soft wash): Wide shot from the street or driveway to show the full roof plane. Algae and moss streaks read clearly from distance. The after is the same shot with the streaks gone.
Carpet cleaning: Side-by-side of the same section of carpet — before shows traffic-lane soiling, after shows the pile restored. Use overhead downward-angle, not a low angle. Overhead captures color and texture honestly.
Christmas lights: Before is a day shot of the roofline with no lights. After is the same shot at dusk with the lights on. The contrast sells the service better than any single photo.
Where Before-and-After Photos Fit in Your Weekly Cadence
The system only works if it's a habit. A habit only sticks if it's dead simple. Here's the cadence I'd recommend for a service business doing 5-15 jobs a week.
Post one before-and-after per working day on Google Business Profile — or at minimum, once a week. The combine photos online hub has more on the broader two-photo workflow if you're also producing non-before/after composites. Same day: post the same image to Facebook and any active neighborhood groups you're in.
Keep a running folder of your 10 best before-and-afters for estimate follow-ups. When you send a quote to a customer, include 2-3 composites from jobs in their neighborhood. Close rates go up. I can't give you a controlled study. I can tell you it's worked consistently at Top Care for three years.
Review the cadence quarterly, not weekly. The goal is to make the system boring — low decisions, low friction, automatic output. If you're still thinking hard about which photo to post, the system isn't simple enough yet.
Common Questions
Does the before photo have to be taken the same day as the after?
Ideally yes. Same day, same lighting conditions, same camera. If you're rebuilding a portfolio from older jobs where you only have the after photos, a before shot of the area in its "normal" state on a return visit can work. It's not ideal, but it's honest and better than no composite at all.
What's the best photo format — JPEG or PNG?
JPEG from your phone camera is fine. Modern phone cameras produce JPEGs at 3000 × 4000 pixels or higher — far more than Google Business Profile or Instagram needs. Don't convert to PNG unless you specifically need transparency. PNGs are larger files with no visible quality advantage for photography.
Do I need to edit or color-correct the photos?
No. Honest photos outperform edited photos on local platforms. The viewer's trust in the transformation depends on the photos looking like real, unedited job site shots. Color correction and cropping introduce doubt. Resistance to editing is a feature, not a limitation.
How do I keep my techs taking before photos consistently?
Make it part of the job checklist, not a separate marketing task. "Take before photo on arrival" goes between "confirm job address" and "walk the property with the customer." It's step 3 of the arrival process, not a creative task. Creative tasks get skipped. Checklist steps don't.
Can I use these photos in paid ads?
Yes. Before-and-after composites from real jobs are some of the highest-performing creative in local service business ads. No stock photos, no staged sets — the same authentic composite you post on GBP can run as a Facebook or Instagram ad with a phone number or booking link as the CTA.
Should I add "Before" and "After" labels to the image?
For obvious transformations (gutter sludge to clean, black algae roof to clean shingles), labels are optional — the transformation speaks. For subtler services (blind cleaning, carpet cleaning), small "Before" / "After" labels in the top corners help orient the viewer. Keep them small, light text, not a headline.
What if my before photo is blurry or poorly lit?
Post it anyway if the after is good and the angle matches. A slightly imperfect before photo with a sharp after photo still communicates transformation. A perfectly composed but staged-looking photo pair does not. Real beats polished every time for a local service business.
How many before-and-afters should I have on my GBP profile?
There's no ceiling. Google Business Profile surfaces recent photos prominently, but older photos don't disappear — they accumulate as a portfolio of proof. Aim for at least 50 before-and-after composites on your profile. Once you're past 100, you've built something competitors can't quickly replicate.
I Built Hosted Snap Because a Before-and-After Shouldn't Take 12 Minutes
Four years ago I was spending 12 minutes per before-and-after photo at Top Care Cleaning. Design app open, template loaded, photos uploaded one by one, watermark removed — on a subscription I'd forgotten I was paying $39/month for. For a photo that should take 60 seconds.
I built Hosted Snap because I needed the boring tool. Two upload slots. One combine button. Output in 10 seconds. No watermark, honest pricing, no influencer-tier subscription. It exists because the alternatives kept failing the basic test and I got tired of waiting for someone else to fix it.
You don't have to use it. Pick any tool that handles the 60-second job without making you pay, sign up, or slap someone else's logo on your customer's house. The tool matters less than the habit. One honest before-and-after per job, every job, for a year. That's what builds the portfolio that wins local search.
About Alex Host
I'm Alex Host. I run marketing for Top Care Cleaning — my family's pressure-washing and exterior-cleaning business in Grand Rapids, Michigan, started by my dad and uncle in 1980. Four hundred-plus Google reviews. Forty-six years of customer work.
Alongside Top Care, I build software at Hosted Brands — the parent company behind Hosted Snap (the free tool you're reading about), Hosted Reviews, Hosted Proof, and the rest of the Hosted Stack. Everything I build is the tool I wished I'd had at Top Care five years ago.
Hosted Snap is free forever. No watermark. No upsell. It exists because the alternatives kept failing the basic test for how to make a before and after photo quickly and honestly, and I got tired of paying freight-train prices for a 60-second job.