Merge Two Pictures Into One: A Service Business Owner's 60-Second Guide
I needed to merge two pictures into one after finishing a paver patio job in Ada Township last spring. I had a great before shot — mossy, stained, practically green — and a sharp after of the same patio once we'd blasted it clean. I tried three different tools. The first put a watermark across the merged image before I could download it. The second wanted my email and credit card before it would show me the result. The third locked the download behind a $14.99/month subscription. Total time wasted: 22 minutes. For a 60-second task.
That experience is why I ended up building my own tool. But before we get there, here's everything I know about how to do it fast, and why service businesses should be doing it twice a week.
What does it mean to merge two pictures into one?
To merge two pictures into one means to combine two separate image files into a single exported image. The most common format is a side-by-side split — before on the left, after on the right, joined along a vertical center line. Other formats include horizontal stacks, overlays, and slider composites. For service businesses, the vertical-split before/after is the format that does the most work on Google Business Profile and local social channels.
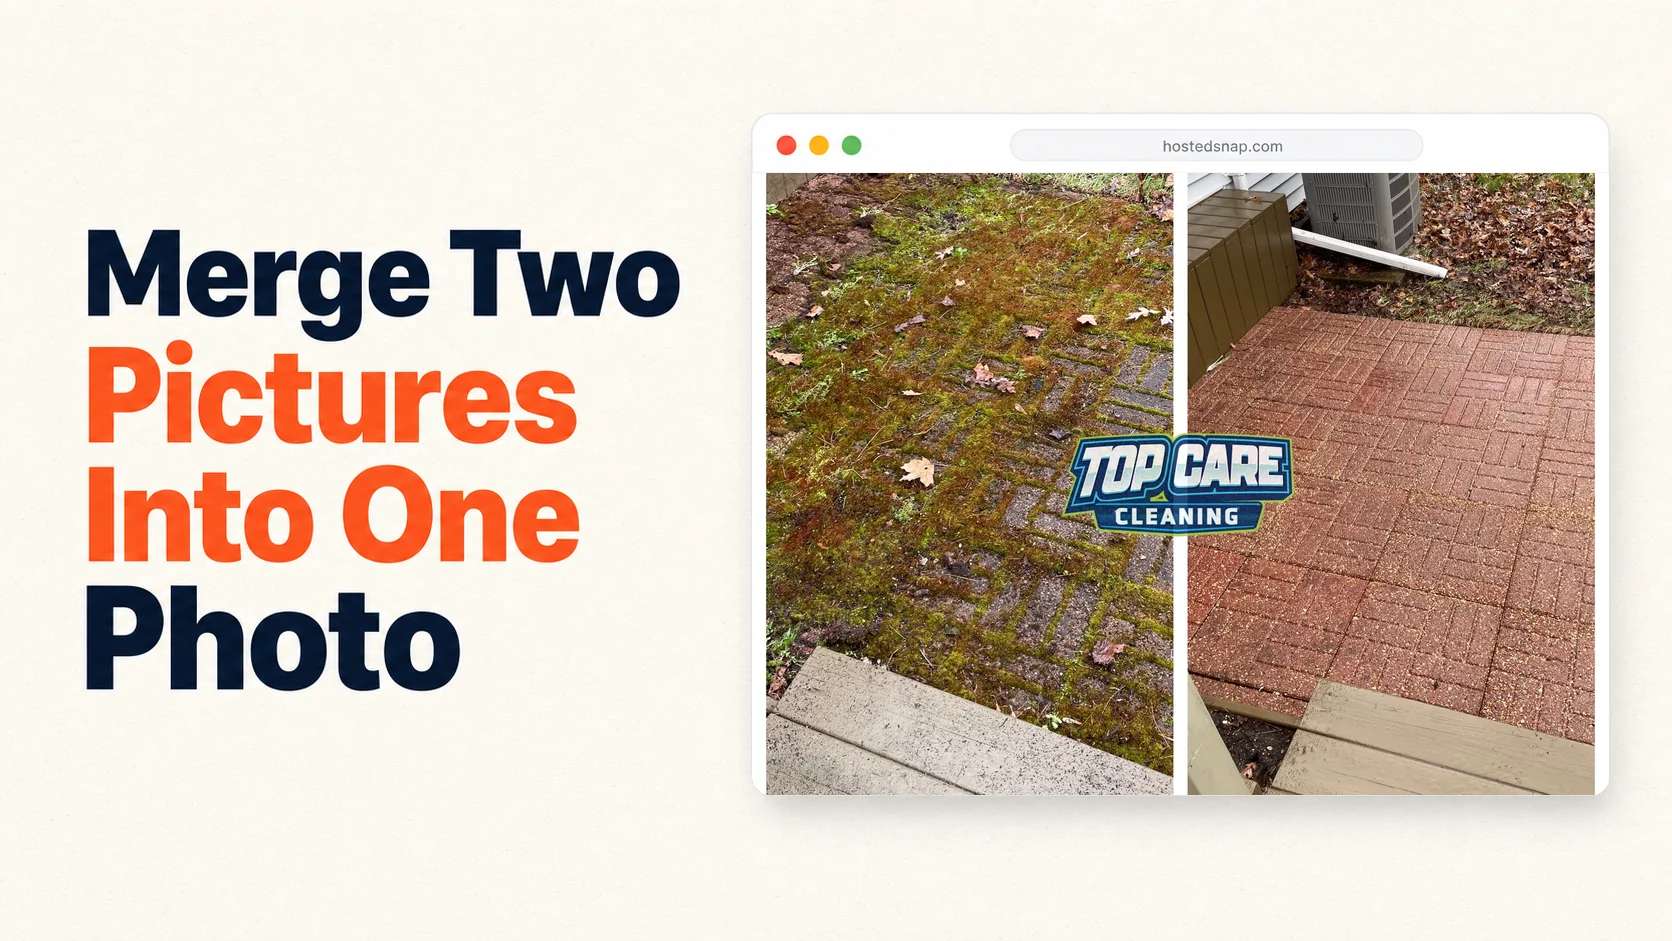
 Real merge from Top Care Cleaning (Grand Rapids, MI) — two paver patio photos merged into one: mossy-and-stained on the left, bright-and-clean on the right. This is the exact kind of merge that wins Tuesday GBP posts.
Why I merge two pictures into one twice a week (and why you should too)
Top Care Cleaning has been in Grand Rapids since 1980. My dad and uncle started it. I run it now with my brother. We've got 400+ Google reviews and a posting cadence that took me four years to dial in.
The single habit that moved our Google Business Profile more than anything else: posting a merged before/after photo every Tuesday morning.
Not a text post. Not a single photo. A merged two-photo image that shows the transformation in one frame.
The psychology behind it
A single "after" photo asks the viewer to imagine the before. That's mental work. Most people checking Google Maps at 7pm on a Tuesday don't want to do mental work. A merged image does it for them — the proof and the result in one frame, one second of attention.
The other factor is trust. A single polished after photo could be stock imagery or a cherry-picked job. When you do it right — same angle, same lighting, same address — the viewer registers the image as evidence, not advertising. For a service business competing against five other companies with similar star ratings, evidence wins.
The GBP post cadence that works for Top Care
One merged image per week. Same day, same template for the caption. Top Care posts every Tuesday — brief job description, neighborhood, one trust line ("family-owned since 1980, fully insured"). The photo does 90% of the persuasion. The caption adds the context.
The GBP algorithm rewards consistency and recency. It doesn't care if you're running the same structure every week. The viewer doesn't either — they're seeing your post once when they search "paver cleaning Grand Rapids," not subscribing to your feed.
If you want the broader philosophy on two-photo posts, the combine two photos side by side pillar covers the full strategy.
The 4 layouts: vertical split, horizontal split, slider, and overlay
Not every merge looks the same. The format you choose should match the subject and the platform. Here are the four layouts worth knowing.
Vertical split
Two photos placed side by side along a vertical center line. Before on the left, after on the right. This is the default for almost every cleaning and exterior service job.
The reason vertical split dominates: most people view GBP and Instagram on a phone in portrait orientation. A vertical split puts both photos at maximum width within that screen. A horizontal stack eats half the vertical space on a phone.
Use vertical split for: house washing, roof cleaning, gutter cleaning, window cleaning, driveway and paver power washing, deck refinishing — anything where the subject is roughly as tall as it is wide, or taller.
Horizontal split
Two photos stacked top-to-bottom along a horizontal center line. Before on top, after on bottom.
Use horizontal split for subjects that are wider than they are tall: a long fence line, a wide roofline photographed from across the yard, a street-facing storefront, a multi-bay commercial parking lot. Don't force a wide subject into a vertical split just because that's the default. You'll crop out the edges of the job and lose the proof.
Slider (before/after reveal)
A single image frame where the viewer drags a divider left or right to reveal the before or after. This is a web-based interactive format, not a static export. You can embed sliders on your website and some platforms support them in posts.
Sliders are great for websites and landing pages. They're less practical for GBP posts and Instagram, which show static images. If you're building a "Work" gallery page, a slider beats a static merge for engagement.
Overlay (ghost/transparency blend)
One photo overlaid on top of the other with adjusted opacity. The before image bleeds through the after, creating a ghosting effect. This is used more in photography and architecture than in service businesses — it's a design technique, not a proof mechanism.
I mention it here because people search for it. For a cleaning company, a ghost overlay of a dirty driveway and a clean one just looks like a dirty driveway. Stick to split or stack for before/afters.
How to merge two pictures into one in under 60 seconds
This is the workflow I run every Monday afternoon to prep Top Care's weekly GBP post. Once you've done it three times, it genuinely takes under a minute.
Step 1: Find and stage your two photos
Open your camera roll or cloud storage. Pull the before photo and the after photo for the same job. Confirm they're the same orientation — both landscape or both portrait. If one is rotated wrong, fix it in your phone's native photo app before uploading anything.
Orientation mismatch is the most common thing that slows people down. Fix it before you open the merge tool.
Step 2: Open a merge tool that does one job
Go to a browser-based tool built specifically for this job. Not a full design platform. Not an app that opens to a template gallery and makes you hunt for the two-photo layout. A tool with two upload slots and a merge button, visible immediately.
The criteria I use: no watermark on export, no signup wall, no deceptive UI that hides the download button behind an "Upgrade" prompt. The photo merger online free article has a four-criteria vetting framework for evaluating any tool you land on.
Step 3: Upload and choose your layout
Upload the before to the left slot, the after to the right slot. Pick vertical split or horizontal stack based on your subject. No need to resize first — a decent merge tool handles the sizing automatically.
Step 4: Add labels if the transformation needs them
Small "Before" and "After" labels in the top corners are fine. For an obvious transformation — mossy pavers vs. clean pavers, green-stained siding vs. white siding — labels are optional. For subtle work (window cleaning, blind cleaning), they help. Keep them small and corner-placed. Don't burn long text into the image.
Step 5: Export at full resolution
Click download. The file should come back at the same resolution as your source photos, not a downsampled 720p version. If it's downsampled, the tool is throttling quality to push you toward a paid tier. Move to a different tool.
Step 6: Post
For Top Care, the merged image goes to GBP as the weekly post, then to Instagram and Facebook the same day. Same photo, different captions, three platforms, one 60-second production step.
If you want a walkthrough of the full combine two photos into one workflow with more detail on export settings and platform specs, that sibling article covers it.
Mistakes I see service businesses make when merging photos
I've made all of these. Some of them more than once.
Using photos shot from different angles
This is the one that kills the proof value completely. If the before is shot from 10 feet away at eye level and the after is shot from 4 feet away looking down, no merge tool will save it. The viewer can't do a mental overlay. The image reads as two unrelated photos, not a transformation.
The fix: when you shoot the "before" at the start of a job, mark your spot. Drop a GPS pin, take a quick screenshot of where you're standing, or use a piece of tape on the driveway. Shoot the after from the same position at the same height. The viewer should be able to mentally overlay the two images.
Shooting before and after in different lighting conditions
The before is shot at 8am with raking side light. The after is shot at 1pm with flat overhead sun. Now the siding looks cleaner partly because of the sun angle, not the work. Viewers register this intuitively as inconsistency, even if they can't name why.
Try to shoot before and after in the same lighting block: morning before, morning after. On overcast days the problem disappears entirely — flat diffuse light reads the same at 8am and 2pm.
Putting a giant logo across the merge
I did this for about a year. A big company logo running across the center of a merged image signals "advertisement." The viewer's trust filter goes up. Small corner watermark or no logo at all. Let the work be the proof. Put the branding in the caption.
I watched my GBP post engagement drop consistently on weeks where I ran the big-logo format. It took me longer than it should have to connect the cause and the effect.
Using a tool that downsamples the output
If your merged export looks softer or smaller than your source photos, the tool is compressing quality to gatekeep the full-res version behind a paid plan. This is a common pattern in "free" merge tools. The test is simple: merge two phone photos and check the file size and pixel dimensions of the download. If the output is a 1.2MP JPEG from two 12MP source photos, the tool is downsampling you.
Burning too much text into the image
Long captions, phone numbers, website URLs, slogans — burned into the merged photo as text layers. The image is for visual proof. The text belongs in the post caption. A clean merge with a strong before/after wins over a cluttered merge with all the contact info crammed in.
If you're looking for a specific merge photos online free walkthrough with clean-output settings, that article covers the platform-specific export options in more detail.
FAQ
How do I merge two pictures into one without a watermark?
Use a tool that explicitly says "no watermark" and doesn't require a paid subscription to download the full export. The test: complete the merge and click download without entering any payment info. If the image arrives with a logo or branding from the tool burned in, the tool is not free — it's free-with-watermark. Find a different one.
Can I do this on my phone without installing an app?
Yes. Browser-based merge tools work on mobile Safari and Chrome without installing anything. Open the tool, upload from your camera roll, choose your layout, and download. The whole flow runs in the browser. No install required.
What file formats can I use?
Most merge tools accept JPEG and PNG. Some accept HEIC (iPhone native format) and WebP. If your tool doesn't accept HEIC, your phone's native share function usually converts to JPEG automatically when you tap "share to browser." If you're uploading from a desktop, convert HEIC files with your OS photo app before uploading.
Does merging two pictures reduce the image quality?
It shouldn't, if the tool is legitimate. A proper merge combines two images at their native resolution and exports at that same resolution. Quality reduction happens when a tool downsamples the output to enforce a paid-tier wall. If your merged image looks noticeably softer than your source photos, the tool is degrading quality intentionally.
What's the best layout for Google Business Profile?
Vertical split is the default winner for GBP on mobile. Most people view GBP on phones in portrait orientation, and a vertical split fills the screen width with both images. Square (1:1) is the most forgiving aspect ratio for GBP if you want a neutral choice. Avoid landscape outputs for GBP — they shrink too aggressively on a phone screen.
How often should I post merged before/after photos on GBP?
Once a week is the cadence that works for Top Care. Consistent weekly posting signals to the GBP algorithm that the business is active. More than once a week is fine if you have the jobs, but the incremental benefit drops off. Don't post three in a day and then go quiet for two weeks — that cadence underperforms weekly consistency.
Can I merge more than two photos?
Technically yes, depending on the tool — some support 3 or 4 photos in a grid. But for GBP and service-business before/afters, two photos is the right number. Three or more becomes a collage, which reads differently from a direct comparison. If you need three photos to tell the story of a job, consider posting two of them as the merge and saving the third for the next week's post.
Is there a difference between merging and combining photos?
In practical use, "merge" and "combine" are the same operation — two images joined into one exported file. Some tools use "combine," some use "merge," some use "join." The underlying action is identical. If you're searching for tools, try both terms. The combine two photos into one article and this one cover the same workflow from slightly different search angles.
I Built Hosted Snap Because Merging Two Pictures Shouldn't Cost $14.99 a Month
The paver job I mentioned at the top wasn't an edge case. I ran into the watermark-and-paywall problem constantly in the early years of running Top Care's marketing. Every "free" tool had a catch buried three steps into the workflow.
I was paying influencer-priced subscription fees to do a 60-second task. The tools weren't built for a family cleaning business posting eight job photos a week — they were built for designers and agencies who need a full suite. I needed one button: merge two pictures into one, download, done.
So I built Hosted Snap. Free. No Pro paywall. No watermark on the output. Honest pricing — which, right now, means no pricing at all. The whole point is removing the friction so service-business owners can actually run the Tuesday posting habit that moves their local search visibility.
If you want the full vetting checklist for picking any merge tool, the photo merger online free proof-gate article runs through it in detail.
About Alex Host
I'm Alex Host. I run Top Care Cleaning in Grand Rapids, MI — a family cleaning business my dad and uncle started in 1980. I work there with my brother. We do house washing, gutter cleaning, roof cleaning, window cleaning, carpet cleaning, and Christmas light installation. 400+ Google reviews. Forty-six years of family operation.
I also build SaaS tools for local service businesses — the kind of tools I wish existed when I was paying $4,000/month in Google Ads and getting nickel-and-dimed by every "free" app in my workflow. The whole portfolio lives at hostedbrands.com. Hosted Snap is the first free tool in the stack. There will be more.
If you're a service-business owner who's tired of paying influencer prices for tools you only use twice a week, I built the stack for us. The free tools are honest about being free. The paid stuff is honest about being paid.