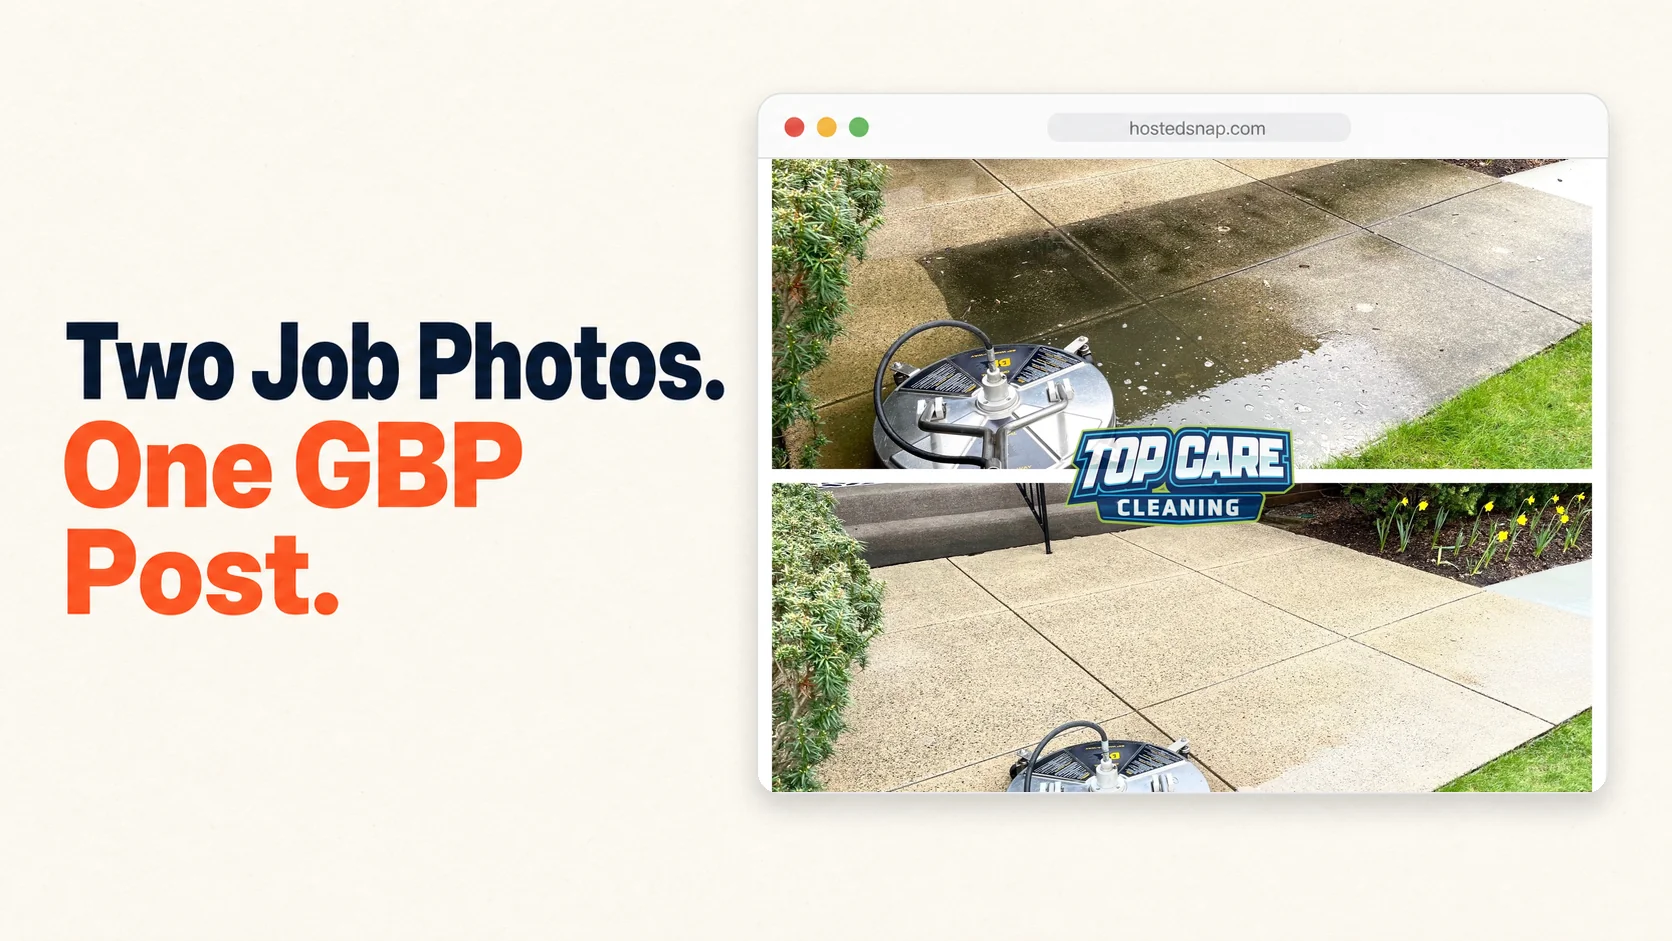
Side by Side Photo: The Two-Photo Post That Quietly Runs My Local Business
I post a side by side photo on Google Business Profile every single Tuesday, and it does more for Top Care Cleaning than any paid ad I've ever bought. Two job photos — same address, same angle, different times — stitched into one image. That's it. No copy genius required. No 10-second hook. Just a before and an after of someone's actual house. I've spent four years figuring out which side-by-side patterns work and which ones get scrolled past. This is the pillar.
What is a side by side photo and why does it matter for service businesses?
A side by side photo is two images joined into one — usually a before-and-after — separated by a vertical or horizontal divider. For service businesses, it's the highest-performing format on Google Business Profile because it shows transformation in one scroll-stoppable frame. One photo proves nothing. Two photos prove the work.
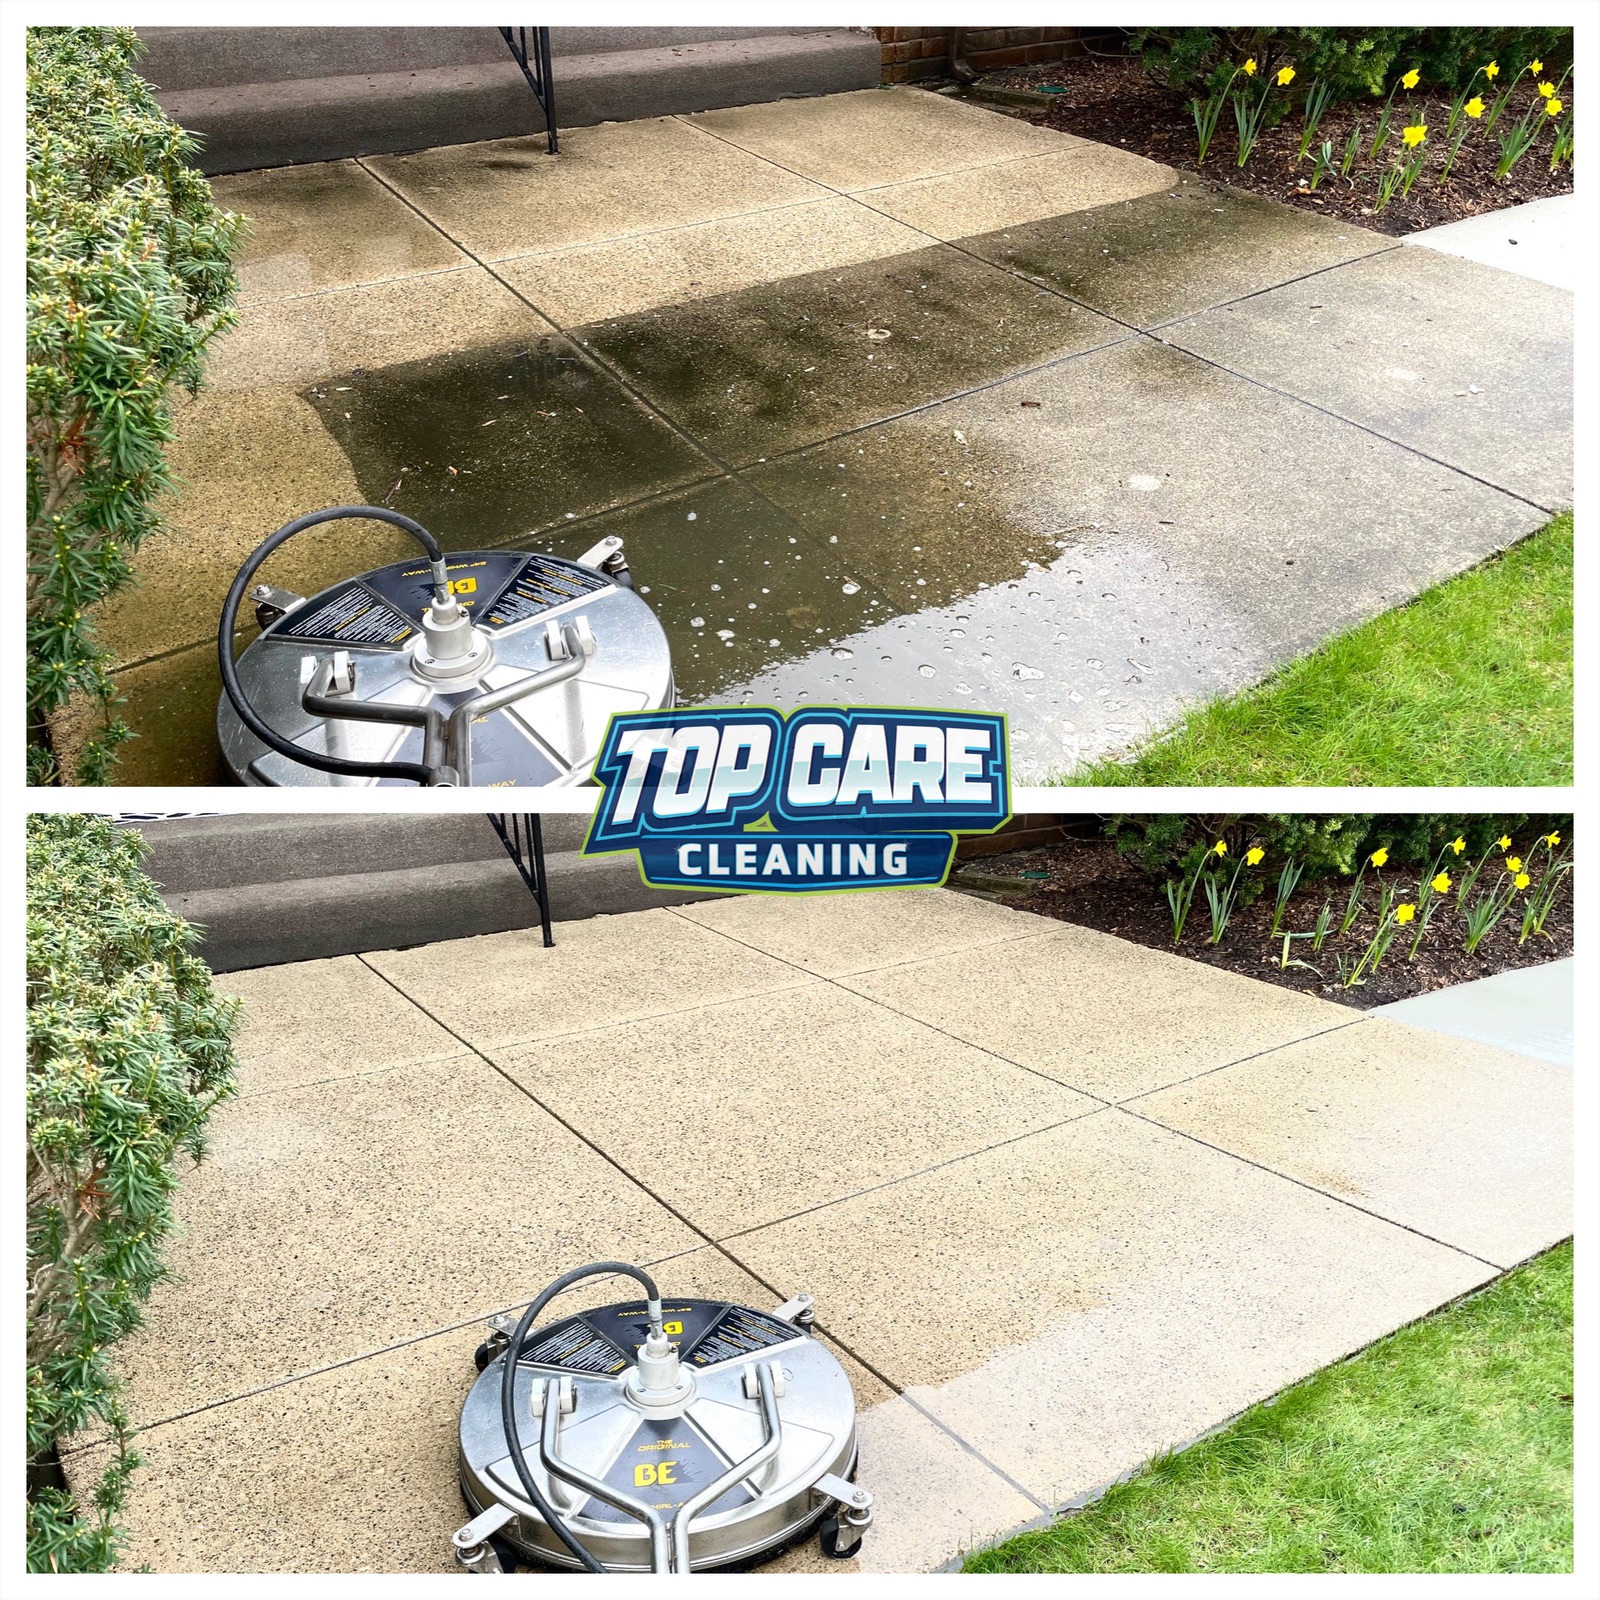 Real side-by-side from Top Care Cleaning (Grand Rapids, MI) — a concrete driveway pressure wash, dirty on the left, clean on the right. This is the exact kind of two-photo post that wins on Google Business Profile every Tuesday.
Why the Side-By-Side Format Outperforms Every Other Photo Post
I'll start with the data I have access to — my own Google Business Profile insights for Top Care Cleaning. Then I'll explain why I think it's structural, not specific to cleaning.
Top Care's GBP posts that use a side-by-side before/after get roughly 3-4× the views of single-photo posts. Phone clicks from posts with a side-by-side run about 2× higher in the week we post one. I don't have agency-grade analytics. I have my own profile, four years of data, and a consistent posting habit. That's enough for me to bet on the format.
The reason is psychological, not platform-specific. A single after photo asks the viewer to imagine the before. That's mental work. Most people scrolling Google Maps at 9pm don't want to do mental work. A side-by-side does the work for them — proof and result in one frame.
The other reason is trust. A single "after" photo could be staged. A side-by-side with the same angle, same lighting, same address is harder to fake. The viewer registers it as evidence, not marketing. For a service business where the buyer is choosing between five companies with similar ratings, "evidence" wins over "marketing."
The Five Side-By-Side Patterns Service Businesses Actually Use
After four years of running these for Top Care, I've narrowed the useful side-by-side formats down to five. Anything outside these five is overthinking it.
Pattern 1: Vertical-Split Before/After
Two photos, same dimensions, joined with a vertical divider in the middle. Before on the left, after on the right. This is the workhorse. Use it for any transformation work where the before and after were shot from the same angle.
The reason vertical-split wins on phones: most people consume Google Business Profile and Instagram on a vertical phone screen. A vertical-split puts both photos at maximum width within that screen real estate. A horizontal-stack format wastes half the screen on letterboxing.
For a cleaning business, this is gutter cleans, house washes, roof cleans, window cleans, driveway power washes — anything where the camera angle is fixed. Same applies to landscaping (before/after a lawn), HVAC duct cleaning, even auto detailing.
Pattern 2: Horizontal-Stack Before/After
Two photos, same dimensions, joined with a horizontal divider. Before on top, after on bottom. Use this when the subject is wider than it is tall — like a long driveway, a fence line, or a roof from across the yard.
The horizontal-stack trades phone-screen efficiency for not cropping the subject in half. If your before photo barely fits the full house in the frame at the wider edge, don't force it into a vertical split. Stack it.
Pattern 3: Two-View Composite (Not Before/After)
This one's underused. Two photos of the same job, but they're NOT a before-and-after. They're two angles or two details of the same finished work. Use this for jobs that look the same start to finish (commercial floor strip, blind cleaning, attic insulation) where there's no dramatic visual transformation, but you still want a two-photo post.
For Top Care, this is window cleaning. A window cleaning before/after looks subtle. But a two photos side by side of the technician on the ladder + the finished crystal-clear window from inside the room? That tells the story.
Pattern 4: Process + Result
One photo of the work being done, one photo of the finished result. Different from before/after — the left photo isn't a "dirty" version, it's a "we were here, here's the work" shot. Then the result on the right.
This works well for trades where the process is impressive (a 30-foot ladder being deployed for gutter cleaning, a power washer crew in full PPE) and the result is clean. The viewer gets the trust signal of seeing real labor AND the satisfaction of the clean result.
Pattern 5: Two-Property Comparison
Two finished jobs at two different addresses, stitched together to show range. "Here's a Cape Cod we washed in Forest Hills. Here's a colonial we washed in East Grand Rapids." Same brand. Different houses. Different aesthetics.
Use this sparingly — once a quarter, not weekly. It's the "look at our range" post, not the "look at this transformation" post. Both have a role.
The Common Mistakes That Kill a Side-By-Side Photo
I've made all of these. Don't repeat them.
Mistake 1: The Two Photos Are Shot From Different Angles
Cardinal sin. If the before is shot from 8 feet away in landscape and the after is shot from 4 feet away in portrait, no side by side photo maker will save the post. The viewer won't read it as evidence — they'll read it as a sloppy collage.
The fix: drop a pin on your phone GPS or take a screenshot of where you stood for the before. After the work is done, return to the same exact spot. Same height, same orientation, same distance. The viewer should be able to mentally overlay the two images.
Mistake 2: Different Lighting (Time of Day)
The before is shot at 8am with side lighting. The after is shot at 2pm with overhead sun. Now the white siding looks "cleaner" in the after partly because of the sun, not the cleaning. The viewer's subconscious flags this as manipulation.
The fix: schedule before and after photos within the same lighting block when possible. Morning before, morning after. Or shoot both on overcast days if you're rebuilding a portfolio of old jobs.
Mistake 3: The Logo Is Bigger Than the Work
A lot of cleaning companies add a giant company logo across the middle of the side-by-side. I've done it. It signals "this is marketing" the second the viewer registers it. Use a small logo — a corner watermark, a baseline tag — or let the photo speak and put your branding in the post caption.
I learned this the hard way after watching engagement drop on posts where I'd cranked up the logo size. The work is the proof. The logo is the bill.
Mistake 4: You Compress the Image Into a Square
Phone cameras shoot in 4:3 or 16:9. Most side-by-side makers default to 1:1 square output because Instagram likes square. The result: both photos get cropped in to fit. The "after" loses the corner of the house that proved the work was complete.
The fix: pick a side-by-side maker that exports at the native aspect ratio of your input photos. Square is fine for Instagram if you want it. But native ratio is better for Google Business Profile, which doesn't care about square.
Mistake 5: You Add Captions Inside the Photo
"Before" and "After" labels are fine — small, corner-placed, low-contrast. But long captions burned into the image ("Pressure washed this driveway in 45 minutes! Call us for a free quote!") destroy the post. Captions belong in the GBP post text or Instagram caption. The image stays clean.
If the side-by-side photo can't communicate the transformation without burned-in text, it's a weak before-and-after. Re-shoot it.
How to Actually Make a Side By Side Photo (The 60-Second Workflow)
I'll walk through the exact flow I run on Mondays for Top Care's weekly GBP post. The whole thing takes under a minute per photo once you've done it twice.
Step 1: Pull your two source photos
Open your Dropbox / Google Drive / camera roll. Find the before and the after. Make sure they're the same orientation (both landscape or both portrait) and similar dimensions.
If one is rotated wrong, fix that now in your phone's photo app. Don't try to fix orientation inside the side-by-side tool — most tools handle that poorly.
Step 2: Open a side-by-side tool
Go to a tool that does exactly one job: combine two photos. Not a design suite. Not a brand-kit manager. A side by side photo maker that opens straight to two upload slots and a "combine" button.
I'm biased — I built Hosted Snap because the existing tools made this 60-second job take 15 minutes. But there are other honest-free tools in the space. The four-criteria test from the photo merger online free article applies: no watermark, no rate limit, no deceptive UI, no influencer-tier subscription.
Step 3: Pick your layout
Vertical-split (Pattern 1) or horizontal-stack (Pattern 2). For a tall subject (house, fence), use vertical-split. For a wide subject (long driveway, roof line), use horizontal-stack. Don't overthink this.
Step 4: Optional — add small Before/After labels
If your tool supports it, add small "Before" and "After" pill labels in the top corners. Coral or blue, white text, small. Skip if your transformation is obvious enough that labels feel patronizing.
Step 5: Export at native resolution
Click download. The exported image should be at the resolution of your source photos, not a downsampled 720p version. If it's downsampled, the tool is downsampling to upsell you on a "Pro" tier. Move to a different tool.
Step 6: Post it
For Top Care, the side-by-side goes on:
- Google Business Profile as that week's post
- The Top Care Instagram and Facebook (same caption, different formatting)
- Sometimes a reply to a Google review where the customer mentioned the specific job
Total time from "find the photos" to "posted": about three minutes once you have the workflow down.
Side-By-Side Photo Tools — What to Look For (and What to Avoid)
Every side-by-side tool falls into one of four categories. Know which one you're using before you commit to a workflow.
Category 1: Free, Honest, Single-Purpose
These tools do one job: combine two photos. No design templates, no subscriptions, no watermark on export. Hosted Snap is in this category. So are a handful of others that don't try to upsell you into a full design suite.
What to look for: the upload slots should be visible on the landing page. The download button should not be smaller than an "Upgrade" button. The export should have no watermark.
Category 2: Free Tier of a Full Design Suite
Canva, Adobe Express, similar. Free tier exists, but the side-by-side template is buried 4 menus deep. The free tier gives you the export, but the path to the export is a 15-minute scenic tour through their full feature set.
These tools are fine if you also need full design features. If you only need to combine two photos, the cost-per-task is way too high. You're paying with time, not dollars.
Category 3: Free-With-Watermark
The "free" tier exports a watermarked image. Pay $14.99/month to remove the watermark. I've called this pattern out before — it's not free, it's free-with-permanent-advertising-attached.
Skip these. Period.
Category 4: Paid Pro Tools
Photoshop, Affinity Photo, dedicated batch-processing apps with API access. These earn their money for designers and agencies producing hundreds of images a day. For a local service business producing 8-12 side-by-sides a week, the cost is overkill.
How Top Care Uses Side-By-Sides Across the Marketing Stack
Here's where the side-by-side photo earns its rent at Top Care Cleaning. I'm sharing the specific channels and frequencies because most articles about side-by-side photos talk about the format in the abstract, not the business application.
Google Business Profile — Weekly Post
One side-by-side per week, every Tuesday morning. Same caption template: brief description of the job (service type, neighborhood), one technical detail (e.g., "house wash with soft wash, not pressure"), one trust signal (e.g., "fully insured, family-owned since 1980"). The photo does 90% of the work. The caption adds context.
GBP doesn't care if you post the same template every week. The algorithm rewards consistency and recency. The viewer doesn't care either — they're seeing your post once when they search for "house washing Grand Rapids," not subscribing to your feed.
Instagram + Facebook — Same Photo, Different Caption
The same side-by-side photo gets posted to Instagram and Facebook later in the day. The caption is longer, more conversational, more personality. The IG post might include the customer's first name if they consented. The Facebook post might include a CTA to message us for a quote.
Same asset, three platforms, three contexts. The side-by-side is the asset.
Google Reviews — Reply Embeds
Occasionally — maybe once every six weeks — a customer leaves a review mentioning a specific job. We reply to the review and include a small side-by-side of their actual house. It's a public signal to anyone reading reviews that we remember the customer, we have the photos, and the work was real.
This is high-leverage. Most cleaning businesses don't do it because most cleaning businesses don't have a workflow that makes producing a side-by-side fast enough.
Lead Follow-Up — Estimate Emails
When we send a quote, we include 2-3 side-by-sides of recent jobs in the same neighborhood. The customer sees the literal results we produced four blocks from their house. Close rate on quotes with embedded side-by-sides runs noticeably higher than quotes without.
Side-By-Side Photo Patterns for Different Trades
The five patterns scale across service-business verticals. Here's the mental model.
Cleaning (pressure washing, roof, gutter, carpet, window): Pattern 1 (vertical-split) is the default. Soft-wash house, pressure-washed driveway, gutter sludge before/after. Vertical-split wins on phones because the subject is usually a tall structure.
Landscaping & lawn care: Pattern 2 (horizontal-stack) for long driveways and lawn lines. Pattern 1 for hedge trimming and tree work. Pattern 5 (two-property comparison) once a quarter to show range.
HVAC, plumbing, electrical: Pattern 4 (process + result). Most of the value is in showing the labor — a tech crawling through a duct, a clean install. The "before" of a dirty duct works, but the "process" angle often performs better.
Auto detailing: Pattern 1 (vertical-split) for interior detailing. Pattern 2 for exterior — the side of a car is wider than it is tall.
Renovation / remodeling: Pattern 1 for room interiors. Pattern 4 (process + result) for kitchens where the demo shots are dramatic. The before and after photo maker pillar covers the renovation framing in depth.
Christmas lights / seasonal: Pattern 1 with the lights ON in the after photo. Day shot before, night shot after. The contrast does the marketing.
Related Side-By-Side Articles on Hosted Snap
This is the pillar. The cluster articles below dig into specific side-by-side use cases and tools:
- Side by side photo maker — the tool-focused walkthrough
- Side by side photo editor — when you need to adjust the two photos before combining
- Two photos side by side — the simple two-photo case
- Two pictures side by side — variant search term, same job
- App for side by side photos — mobile-focused use cases
- Side by side photo generator — generator-style query
- Side by side image maker — "image" terminology variant
- Put two photos side by side — how-to framing
- Picture side by side app — app-focused variant
- Create side by side photo — action-verb variant
And the related hub: Combine two photos side by side — Snap Pillar 1, broader two-photo combination topic.
Side By Side Photo — FAQ
What's the best aspect ratio for a side by side photo?
For Google Business Profile and Instagram feed, 1:1 (square) or 4:5 (portrait) work best. For Facebook and websites, 16:9 (landscape) gives you more room. The native aspect of your source photos is usually the best default — don't crop unless you have to.
Should I add "Before" and "After" labels?
For obvious transformations (gutter sludge → clean gutters, dingy siding → bright siding), labels are optional. For subtle transformations (window cleaning, blind cleaning, attic insulation), labels help. Keep them small, corner-placed, and low-contrast — they shouldn't dominate the image.
Can I combine more than two photos into a side by side?
Technically yes, but at three or more photos you're making a collage, not a side-by-side. For services that genuinely need three+ photos (multi-room renovation, large commercial jobs), a 3-up or 4-up grid is better. For most service-business posts, two photos is the right number.
How often should I post side-by-sides on Google Business Profile?
Once a week, consistently, is enough. More than that and you're competing with yourself for views. The algorithm rewards recency, so spacing posts out weekly is better than batching three in a day.
Do side-by-side photos work on Instagram Stories?
Yes, but the vertical aspect of Stories means you should use Pattern 2 (horizontal-stack) more often than Pattern 1. The horizontal-stack fills the vertical Story frame better than two side-by-side photos that get letterboxed.
What's the difference between a side-by-side photo and a photo collage?
A side-by-side photo is exactly two photos joined into one frame. A collage is 3+ photos in a grid, mosaic, or pattern. Side-by-sides are best for direct comparison or before/after. Collages are best for showing range or storytelling across multiple moments.
Can I make a side by side photo on my phone?
Yes — any browser-based side-by-side tool works on mobile. The app for side by side photos walkthrough covers the mobile flow specifically. You don't need to install a native app for most use cases.
How do I avoid making my side-by-side look like a Canva template?
Pick a tool that doesn't apply heavy template styling — no thick borders, no shadow effects, no "frame" overlays. The two photos should sit next to each other with a thin divider (or no divider). Anything more is decoration that distracts from the transformation.
I Built Hosted Snap Because a Side-By-Side Should Take 60 Seconds
Four years ago I was making side-by-sides for Top Care using a design app that took 12 minutes per photo. I had a marketing system that didn't scale because the production step was too slow. So I built Hosted Snap — a free side-by-side photo tool that does the one job and gets out of your way.
It's free. No Pro tier for at least six months. No watermark. No signup wall in the usual sense. The whole point is removing the 12-minute tax so service-business owners can actually post the weekly side-by-side that grows their local search visibility.
If you want the broader two-photo combination article, combine two photos side by side is the main hub. This pillar focuses on the service-business application of the side-by-side format specifically.
About Alex Host
I'm Alex Host. I run Top Care Cleaning in Grand Rapids, MI — a family cleaning business my dad and uncle started in 1980. I work there with my brother. We do house washing, gutter cleaning, roof cleaning, window cleaning, carpet cleaning, and Christmas light installation. 400+ Google reviews. Forty-six years of family operation.
I also build SaaS tools for local service businesses — the kind of tools I wish existed when I was paying $4,000/month in Google Ads and getting nickel-and-dimed by every "free" app in my workflow. The whole portfolio lives at hostedbrands.com. Hosted Snap is the first free tool in the stack. There will be more.
If you're a service-business owner who's tired of paying influencer prices for tools you only use twice a week, I built the stack for us. The free tools are honest about being free. The paid stuff is honest about being paid.